Table of Contents
- How to add Google reviews to any website (HTML)
- Embedding Google reviews with Testimonial.to
- Embed all your testimonials in one place
- Collect testimonials more easily
- How to add Google reviews to Wix
- Option 1: Embed HTML
- Option 2: Wix apps
- Option 3: Testimonial.to
- How to add Google reviews to Squarespace
- Option 1: Embed HTML
- Option 2: Testimonial.to
- How to add Google reviews to WordPress
- Option 1: Embed HTML
- Option 2: WordPress plugins
- Option 3: Testimonial.to
- How to add Google reviews to Weebly
- Option 1: Embed HTML
- Option 2: Testimonial.to
- How to add Google reviews to Shopify
- Option 1: Embed HTML
- Option 2: Shopify apps
- Option 3: Testimonial.to
- Wrapping up…

Image URL
AI summary
Title
Date
Description
Status
Current Column
Person
Writer
Getting customers to give you feedback on your services or product is hard enough.
So, when they finally do get there, and leave that shiny 5-star Google review… you want to scream it from the rooftops!
And what better way to do this than embed the review on your very own website?
In this article, I’ll show you how to add your Google reviews to any website.
Whether you use Wix, Squarespace, WordPress, Weebly, Shopify, or plain good old HTML — I’ve got you covered!
I’ve organized this post into several sections so you can pick the one that’s most relevant to you:
1) How to add Google reviews to any website (HTML)
2) How to add Google reviews to Wix
3) How to add Google reviews to Squarespace
4) How to add Google reviews to WordPress
5) How to add Google reviews to Weebly
6) How to add Google reviews to Shopify
Don’t want to bother with complicated tutorials? Make testimonials a one-time, headache-free setup with Testimonial.to: sign up for a free trial.
How to add Google reviews to any website (HTML)
Embedding Google reviews to your website is much easier than it sounds.
Here’s what you have to do:

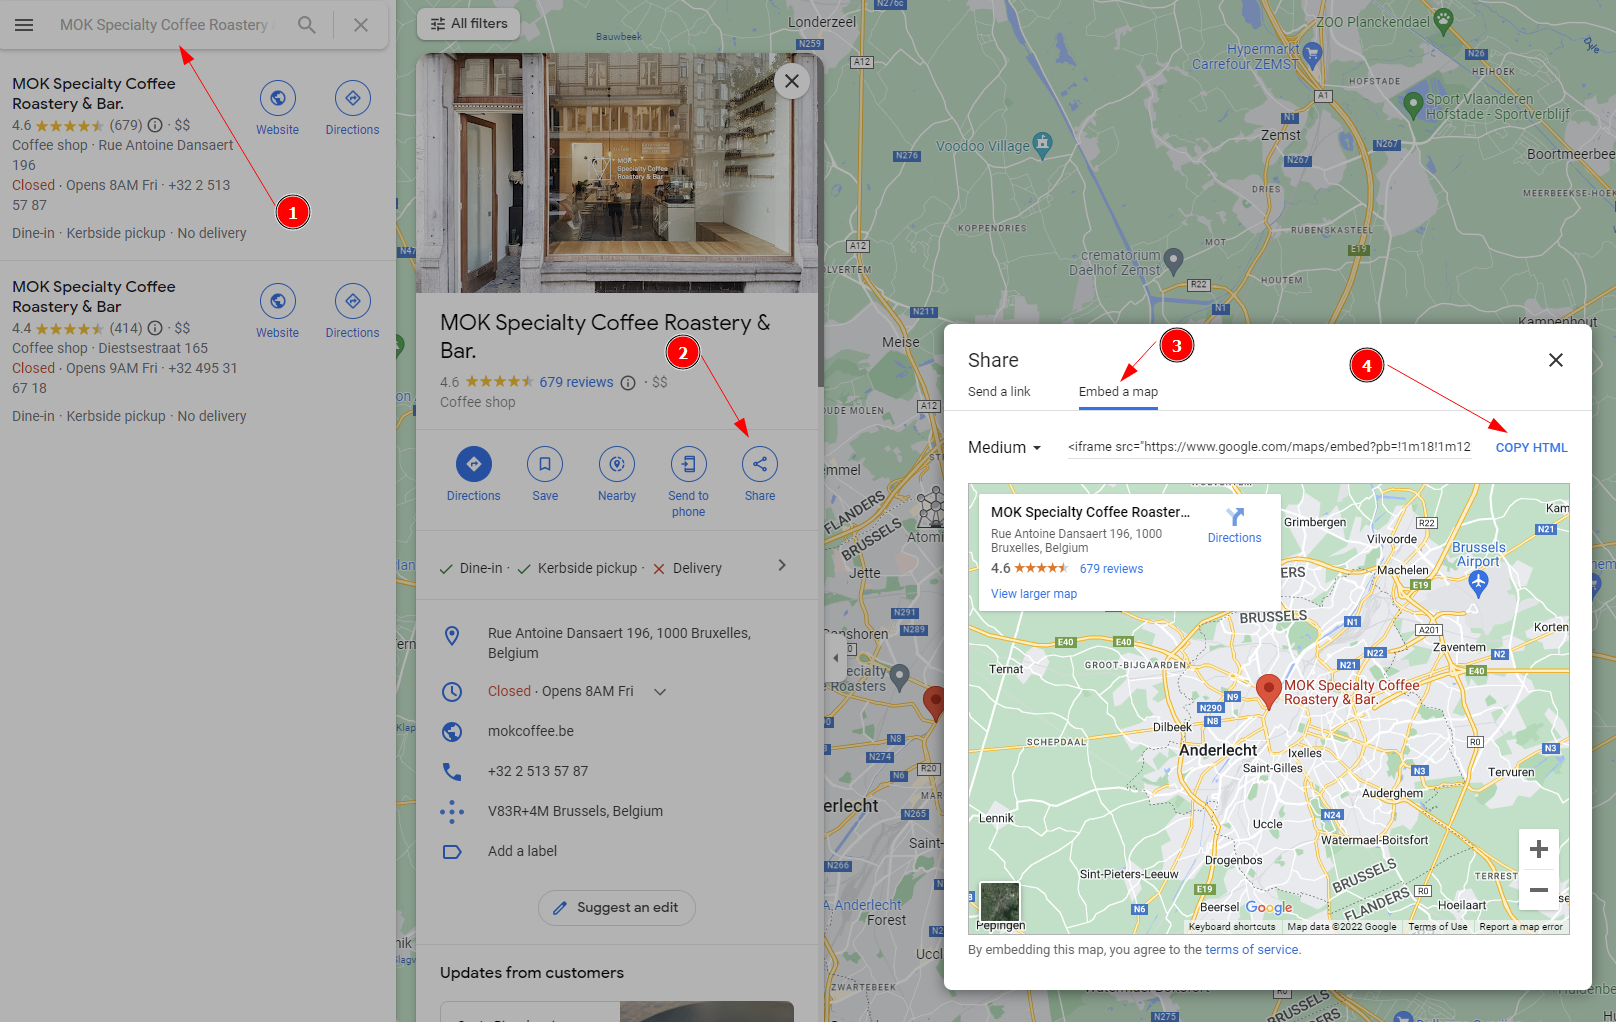
- Open Google Maps, then search for your business name.
- Click “Share”.
- Select “Embed a map”.
- Click “Copy HTML”.
- Paste the code on your website where you want to display your reviews.
It’s that simple!
However, this is the only method that comes straight from Google. And it has a few problems:
1) Maybe you don’t want to embed a map on your website. What if your location is irrelevant?
2) No customization. If this map doesn’t fit “just right” on your site, you’ll have to go above and beyond in CSS to make it look nice.
3) Can’t select specific reviews. Google will simply list reviews by “most relevant”, “newest”, “highest” or “lowest”.
But, no worries—there is a better way!
Embedding Google reviews with Testimonial.to
With Testimonial.to, adding Google reviews to your website is a similar process.
First, create a Testimonial.to account. Then, in your dashboard:
- Go to your desired space.
- Select “Embed code for the wall”.
- You’ll be met with a simple Javascript snippet. Click “Copy”.
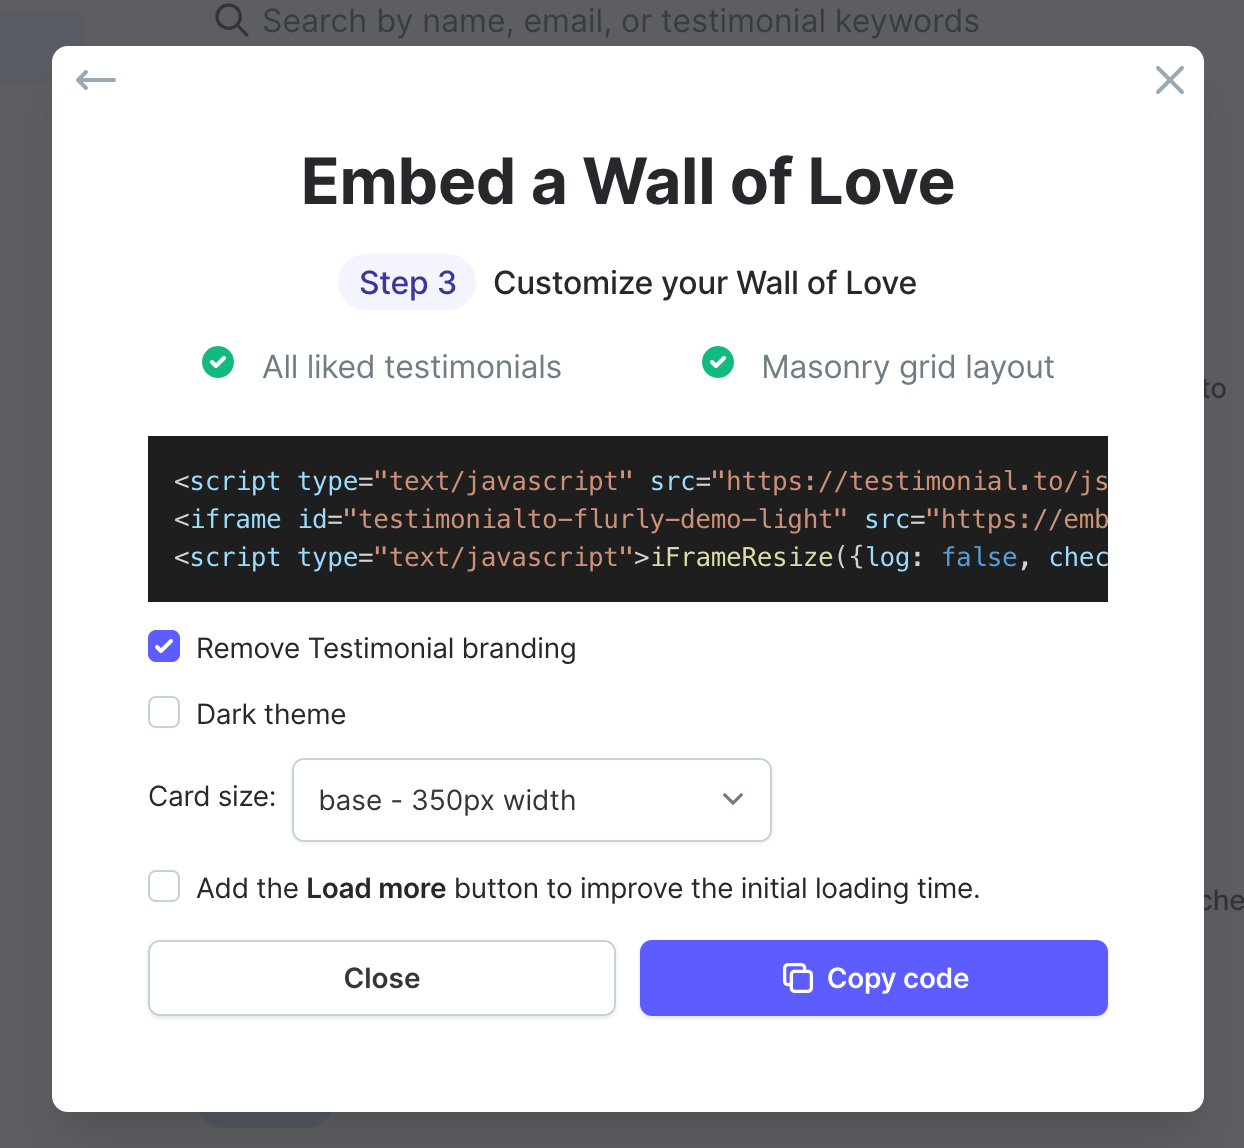
You can then paste this snippet anywhere you like on your website.
Embed all your testimonials in one place
The best part about this snippet code is that it doesn’t handle just Google reviews.
If you want to add tweets from Twitter, Yelp reviews, and even one-time text or video testimonials, you can too.
We call this the Wall of Love. It looks something like this, and is 100% customizable!

Collect testimonials more easily
Another advantage of using Testimonial.to: collecting testimonials is a breeze.
Built-in landing pages are a one-time, 5 minutes setup.
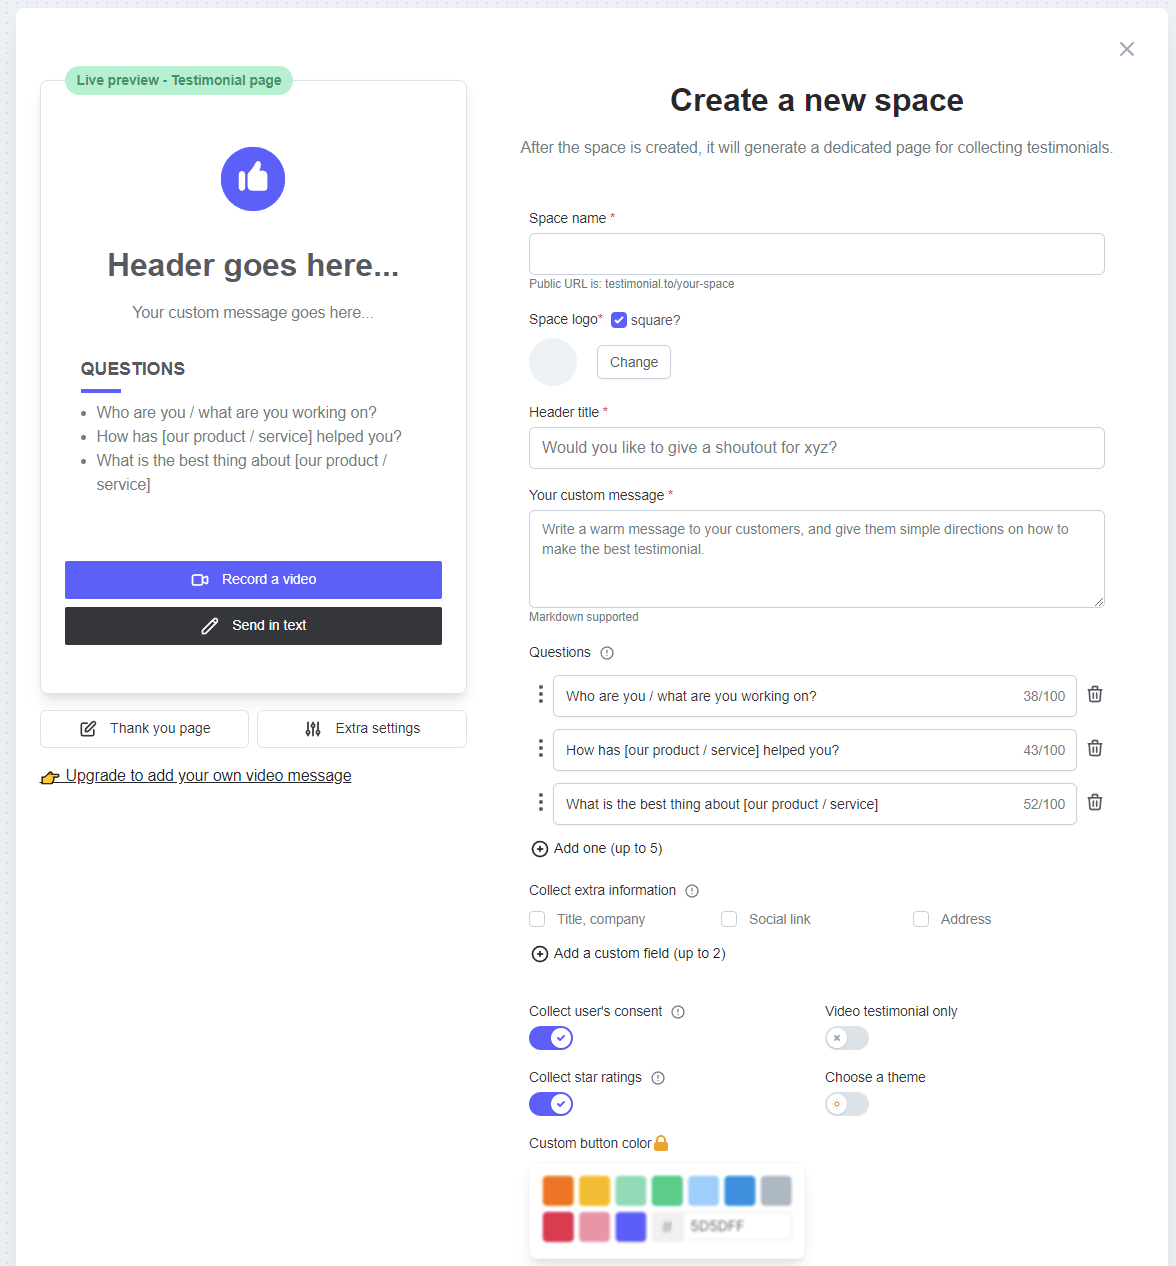
From then on, any customer you send there will be guided through the whole process:
- Welcome message. Make them feel special!
- Customizable questions:
- Who are you?
- How did [our product/service] help you?
- What is the best thing about [our product/service]?
- “Record a video” or “Send in text” button. Simple and frictionless.
- Customize colors, add a gift incentive… and whatever else you can think of!
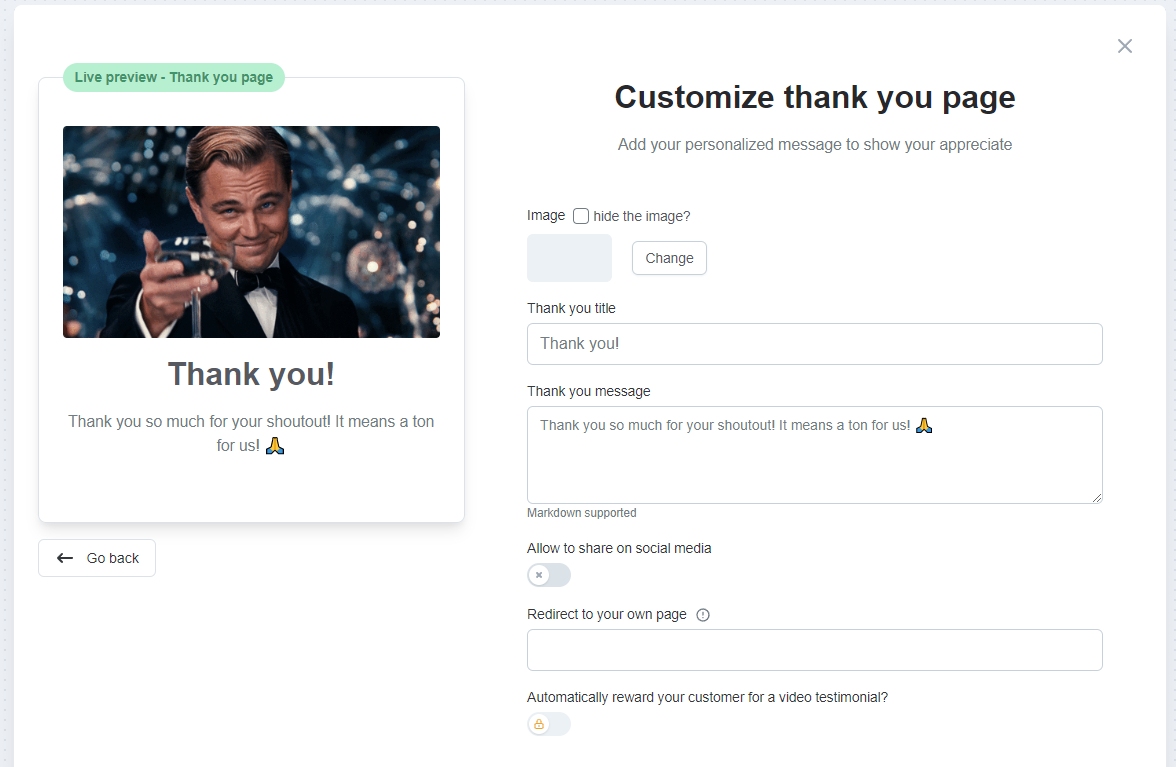
And, of course… don’t forget to say thanks!
Sounds too good to pass on? We think so, too. Sign up for a free Testimonial.to trial!
How to add Google reviews to Wix
There are several ways to embed Google reviews on your Wix website.
Option 1: Embed HTML
First, grab your HTML snippet from Google Maps.
Here’s what you have to do:

- Open Google Maps, search for your business name.
- Click “Share”.
- Select “Embed a map”.
- Click “Copy HTML”.
Then, open your Wix dashboard.
- Click “Customize site”.
- On the sidebar to the left, click the “+” button (Add Element).

- Select “Embed Code”, then “Embed HTML”.
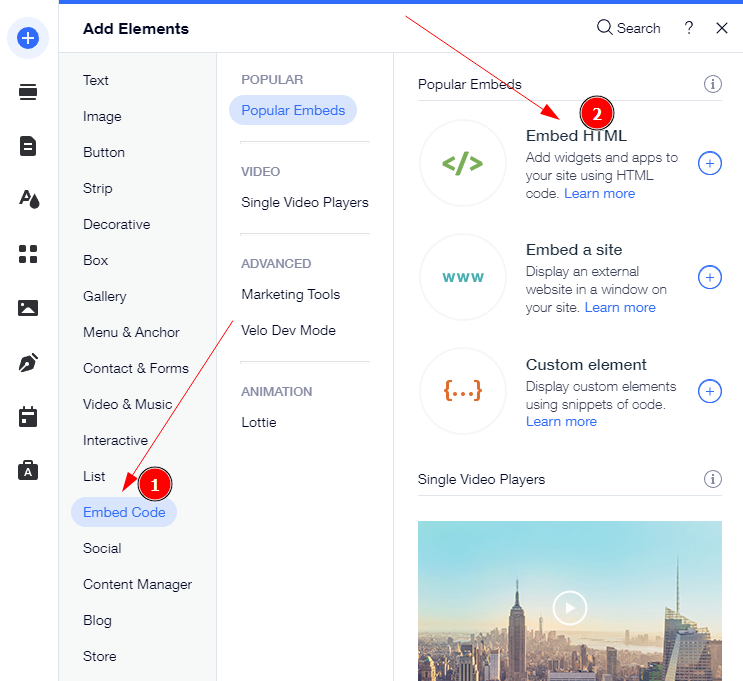
- Place this new element anywhere you like on your site, then hit “Enter Code”.
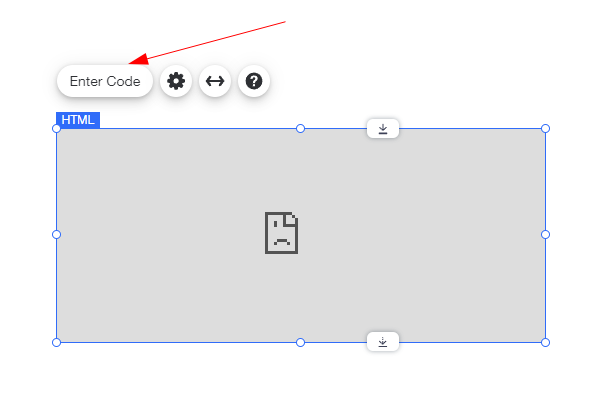
- Paste the code you copied earlier—done!
This option has a few issues, however:
- You are stuck with the “maps” view. Sadly, this is the only option Google provides.
- You can’t organize your reviews.
- No customization. If this doesn’t fit quite right on your site, you’ll have to go out of your way with CSS to make it look nice.
If this is a deal breaker for you—check out options 2 and 3.
Option 2: Wix apps
Wix offers a marketplace of apps you can leverage when you build your website.
Naturally, Google reviews apps are plenty:

The advantage of using an existing Wix app is that you don’t have to bother with adding the code yourself.
These apps simply pull the data from your existing Google My Business account and display that data on your site.
Because there are plenty of choices, it’s difficult to say which one will work best for you. Trial and error until you find one that fits!
The one issue we have with Wix apps is that having too many of them will either break your site or slow it down noticeably.
Plus, customization is not their strong suit. And since they’re free, they are a little limited in functionality.
If you already have a lot of apps, consider option 3: using Testimonial.to.
Option 3: Testimonial.to
After creating a Testimonial.to account, head over to your dashboard, and:
- Go to your desired space.
- Select “Embed code for the wall”.
- You’ll be met with a simple Javascript snippet. Click “Copy”.
With this snippet in your clipboard, open your Wix dashboard and follow the steps from option 1:
- Click “Customize site”.
- On the sidebar to the left, click the “+” button (Add Element).
- Select “Embed Code”, then “Embed HTML”:

- Drag this new window anywhere you like on your website.
- Hit “Enter code”, and paste the code from your clipboard.
After you publish your site, you’ll notice your reviews are live.

The best part about Testimonial.to is that it’s not “just” Google reviews:
1) You get all your testimonials in one place (Facebook, ProductHunt…)
2) You can pick and choose your favorite reviews and organize them how you like
3) It’s 100% customizable
4) It’s easier to collect reviews with built-in feedback pages
5) Analytics to see how your reviews perform
Sounds too good to pass on? We think so, too. Sign up for a free Testimonial.to trial!
How to add Google reviews to Squarespace
There are two options to embed Google reviews on your Squarespace website.
Option 1: Embed HTML
First, grab your HTML snippet from Google Maps.
Here’s what you have to do:
- Open Google Maps, search for your business name.
- Click “Share”.
- Select “Embed a map”.
- Click “Copy HTML”.
Then, head over to your Squarespace website editor.
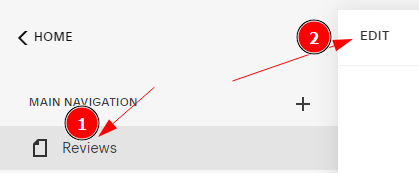
- Create a new blank page called “Reviews” (or select the page you’d like to add reviews to), then click “Edit”.
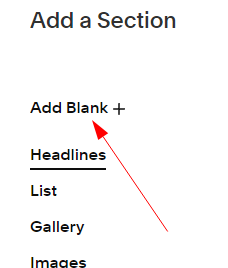
- Next, click “Add section”, and choose “Add Blank”.
- Click the block where you’d like to add your reviews, and choose “Code”.
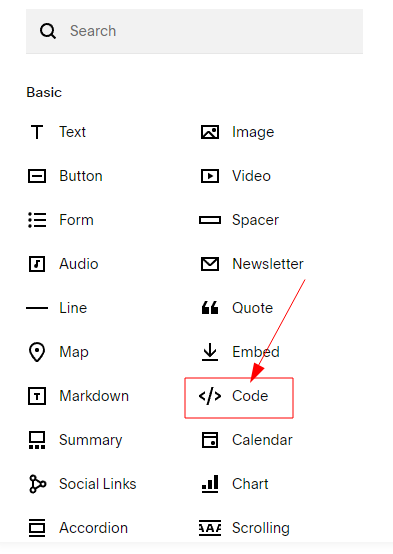
- Choose “HTML” mode, then paste the snippet you just copied in Google Maps.
…that’s it. Your reviews are live!
There are just a few issues with this method:
- You are stuck with the “maps” view. Sadly, this is the only option Google provides.
- You can’t organize your reviews.
- No customization. If this doesn’t fit quite right on your site, you’ll have to go out of your way with CSS to make it look nice.
If this is a deal breaker for you, check out option 2.
Option 2: Testimonial.to
After creating a Testimonial.to account, head over to your dashboard, and:
- Go to your desired space.
- Select “Embed code for the wall”.
- You’ll be met with a simple Javascript snippet. Click “Copy”.
With this snippet in your clipboard, open your Squarespace editor and follow the steps from option 1:
- Create a new blank page or select the page you want to add reviews to, and click Edit.
- Add a Blank section.
- Click the block where you’d like to add your reviews, choose “Code”, and paste the snippet from your clipboard.
That’s it! Your reviews are live.

The best part about Testimonial.to is that it’s not “just” Google reviews:
1) You get all your testimonials in one place (Facebook, ProductHunt…)
2) You can pick and choose your favorite reviews and organize them how you like
3) It’s 100% customizable
4) It’s easier to collect reviews with built-in feedback pages
5) Analytics to see how your reviews perform
Sounds too good to pass on? We think so, too. Sign up for a free Testimonial.to trial!
How to add Google reviews to WordPress
WordPress is one of the most popular CMS solutions out there—and for good reason!
So how do you add Google reviews to your WordPress website? There are 3 options.
Option 1: Embed HTML
First, grab your HTML snippet from Google Maps.
Here’s what you have to do:

- Open Google Maps, then search for your business name.
- Click “Share”.
- Select “Embed a map”.
- Click “Copy HTML”.
Next, head over to your WordPress admin.
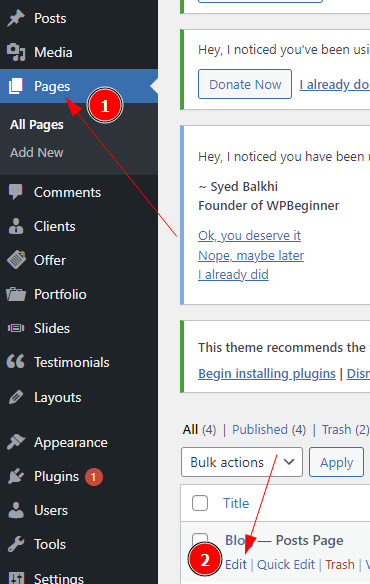
- In the left side menu, head over to “Pages”.
- Choose the page you want to add reviews to and click “Edit”.
- What you see now will highly depend on your theme. By default, click the “+” Button in the top-left corner.

- Next, click “Custom HTML”.
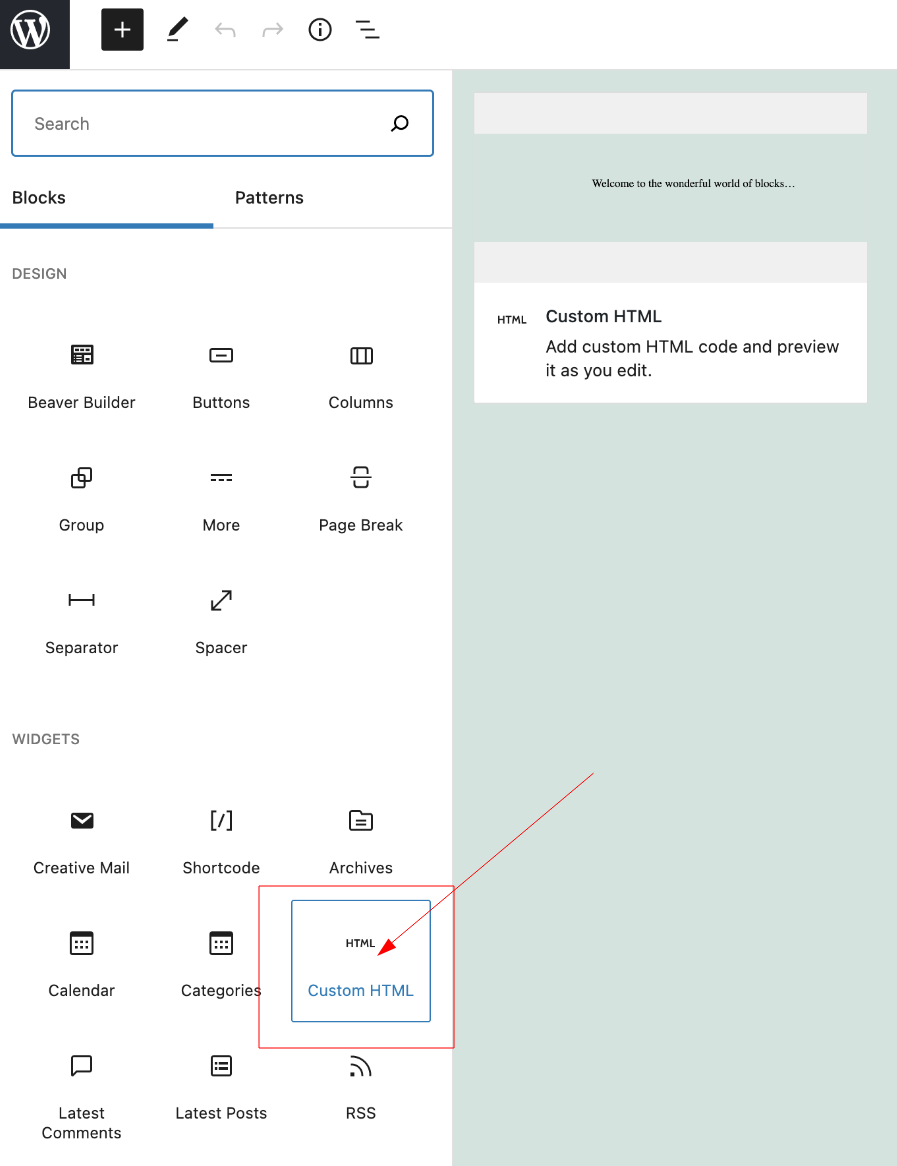
- Finally, paste the snippet into your clipboard.
Done! Your reviews are live.
There are just a few issues with this method:
- You are stuck with the “maps” view. Sadly, this is the only option Google provides.
- You can’t organize your reviews.
- No customization. If this doesn’t fit quite right on your site, you’ll have to go out of your way with CSS to make it look nice.
If this is a deal breaker, check out options 2 and 3.
Option 2: WordPress plugins
WordPress offers hundreds—nay, thousands—of plugins to help you customize your website.
Google Reviews plugins are no exception:
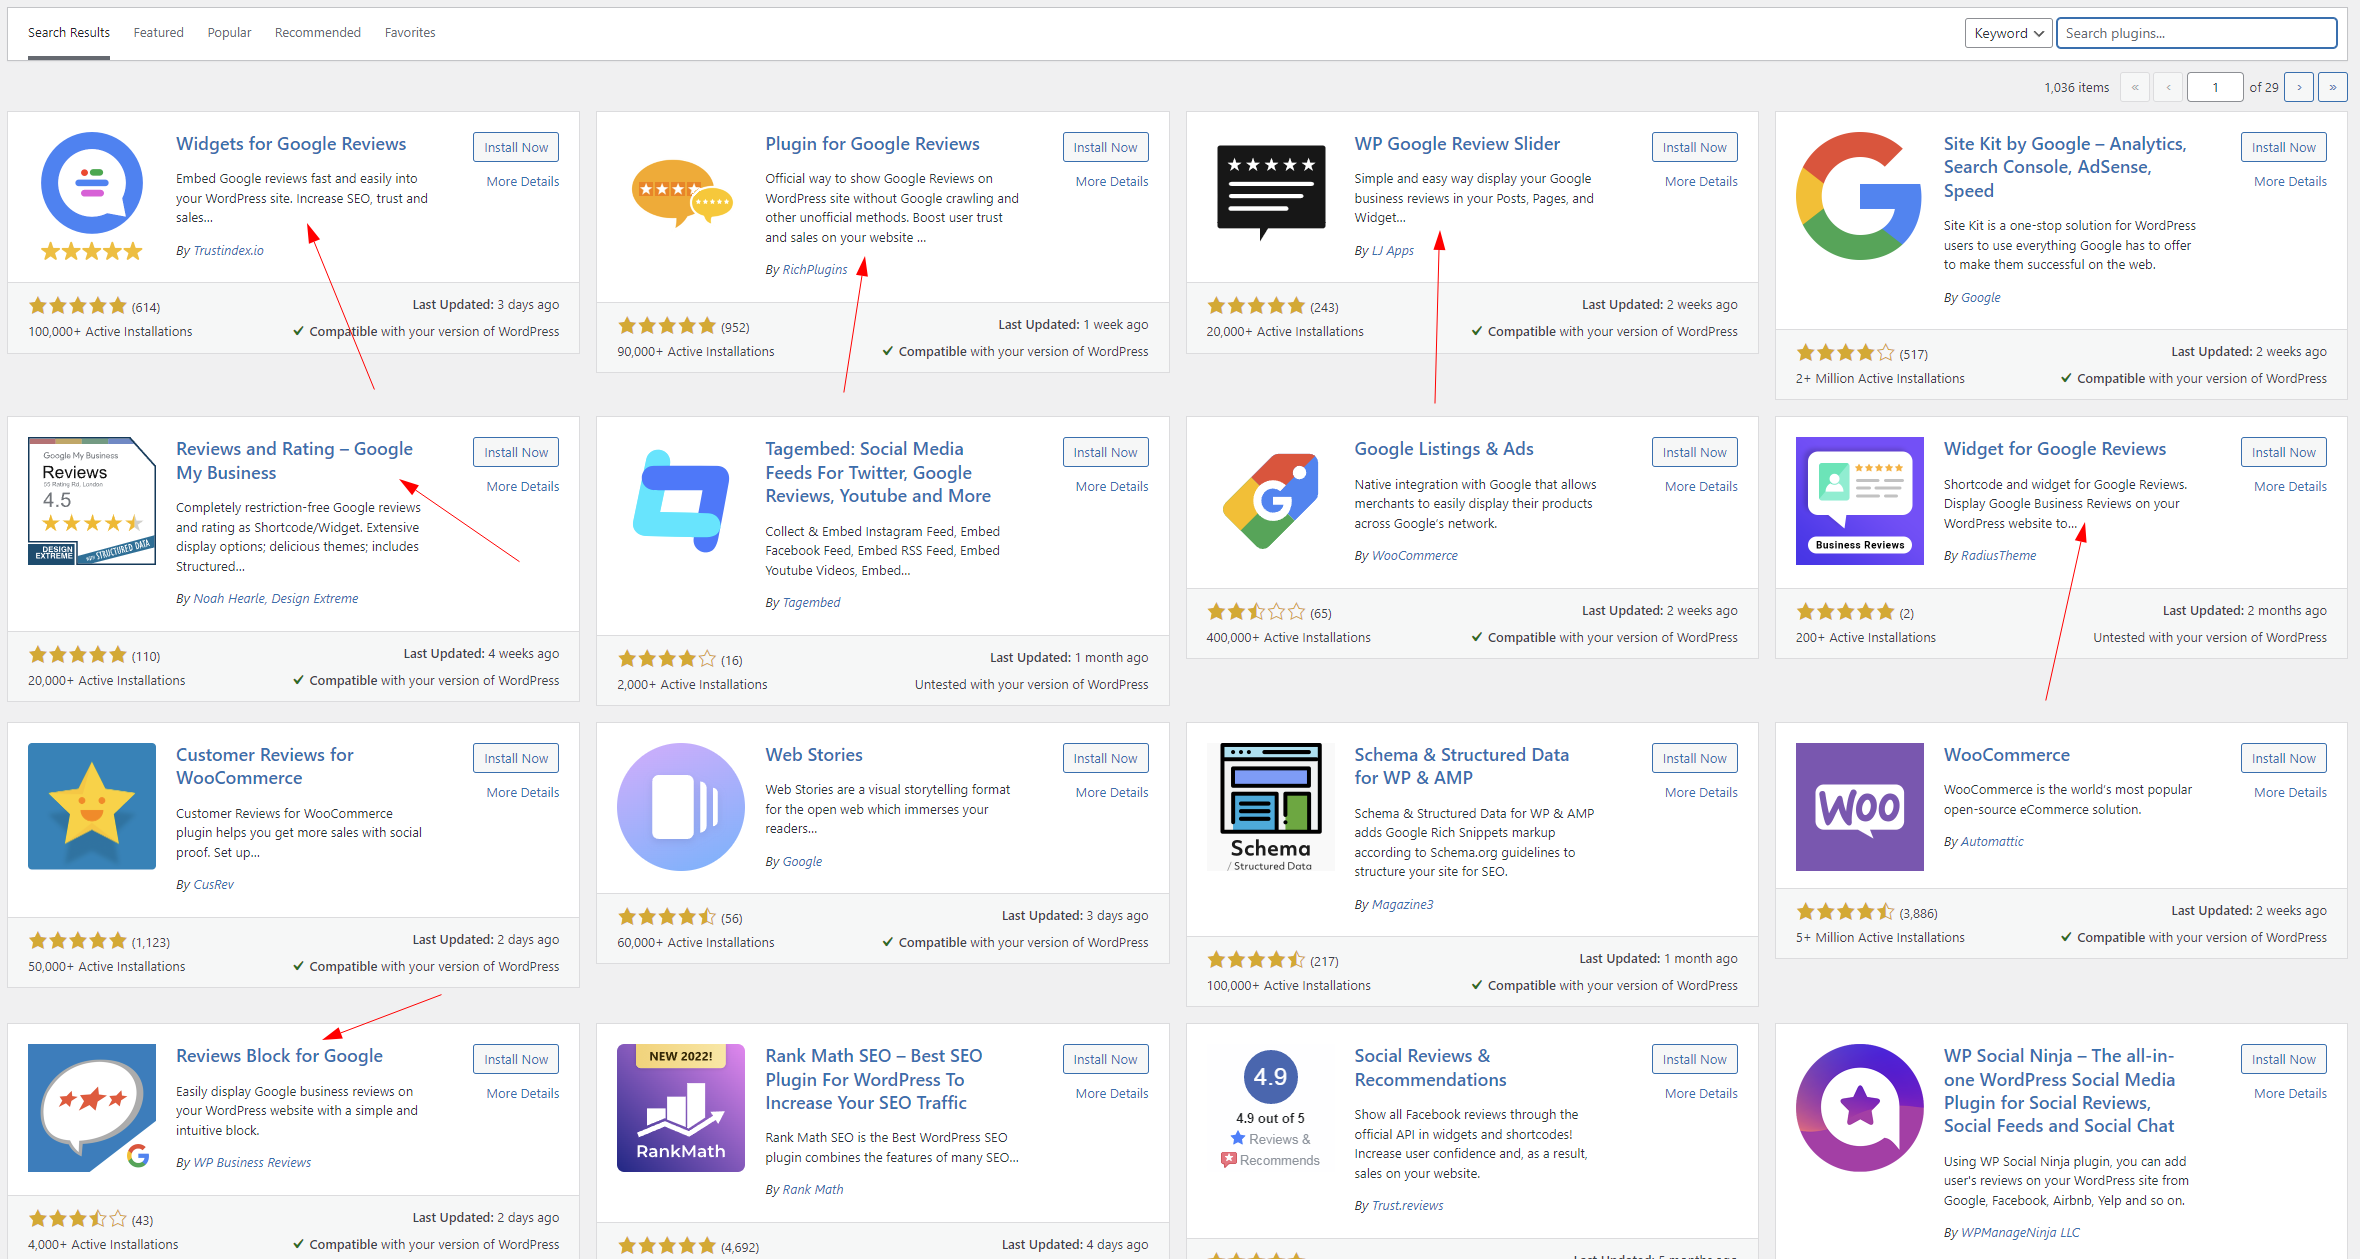
The advantage of using an existing plugin is you don’t have to do any custom coding yourself.
These simply pull the data from your existing Google My Business account and handle all the rest.
There are a lot of choices, so it’s difficult to say which plugin will work best for you. Trial and error until you find one that fits!
The one issue with WordPress plugins is that generally speaking, customization is not their strong suit. And since they’re free, they are a little limited in functionality.
If that’s a problem, consider using option 3: Testimonial.to.
Option 3: Testimonial.to
After creating a Testimonial.to account, head over to your dashboard, and:
- Go to your desired space.
- Select “Embed code for the wall”.
- You’ll be met with a simple Javascript snippet. Click “Copy”.
With this snippet in your clipboard, open your WordPress admin and follow the steps from option 1:
- Choose the page you want to add the reviews to and click “Edit”.
- Add a new Custom HTML block.
- Paste the snippet from your clipboard.
…and just like that, your awesome Wall of Love is live.

The best part about Testimonial.to is that it’s not “just” Google reviews:
1) You get all your testimonials in one place (Facebook, ProductHunt…)
2) You can pick and choose your favorite reviews and organize them how you like
3) It’s 100% customizable
4) It’s easier to collect reviews with built-in feedback pages
5) Analytics to see how your reviews perform
Sounds too good to pass on? We think so, too. Sign up for a free Testimonial.to trial!
How to add Google reviews to Weebly
Embedding Google reviews to your Weebly website is a simple process.
There are two options.
Option 1: Embed HTML
First, grab your HTML snippet from Google Maps.
Here’s what you have to do:

- Open Google Maps, then search for your business name.
- Click “Share”.
- Select “Embed a map”.
- Click “Copy HTML”.
Next, head over to the Weebly editor.
- Select “Pages”, and pick the page you want to add reviews to.
- Click “Build”.
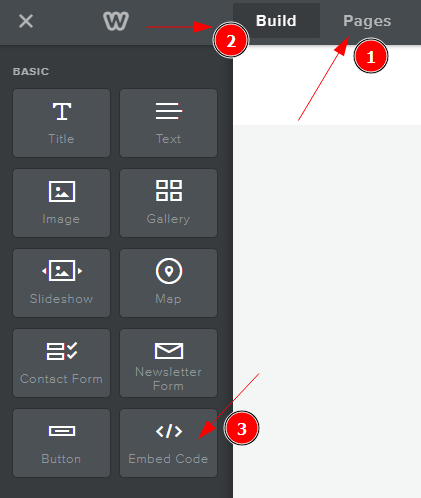
- Select the “Embed Code” block, and simply drag it where you want testimonials to appear.
- Click on the block you’ve just created, then “Edit Custom HTML”.

- Paste the snippet code from your clipboard.
Done! Your Google reviews are live.
There’s just a few issues with this method:
- You are stuck with the “maps” view. Sadly, this is the only option Google provides.
- You can’t organize your reviews.
- No customization. If this doesn’t fit quite right on your site, you’ll have to go out of your way with CSS to make it look nice.
If this is a deal breaker for you, check out the next option.
Option 2: Testimonial.to
After creating a Testimonial.to account, head over to your dashboard, and:
- Go to your desired space.
- Select “Embed code for the wall”.
- You’ll be met with a simple Javascript snippet. Click “Copy”.
With this snippet in your clipboard, open the Weebly editor and follow the steps from option 1:
- Select “Pages”, and pick the page you want to add reviews to. Then, click “Build”.
- Select the “Embed Code” block, and drag it where you want reviews to appear.
- Click the block, then “Edit Custom HTML”, and paste the snippet from your clipboard.
Your reviews now look something like this:

The best part about Testimonial.to is that it’s not “just” Google reviews:
1) You get all your testimonials in one place (Facebook, ProductHunt…)
2) You can pick and choose your favorite reviews and organize them how you like
3) It’s 100% customizable
4) It’s easier to collect reviews with built-in feedback pages
5) Analytics to see how your reviews perform
Sounds too good to pass on? We think so, too. Sign up for a free Testimonial.to trial!
How to add Google reviews to Shopify
Adding Google reviews to your Shopify products is an excellent way to create trust—and land more sales.
There are three options on Shopify.
Option 1: Embed HTML
First, grab your HTML snippet from Google Maps.
Here’s what you have to do:

- Open Google Maps, search for your business name.
- Click “Share”.
- Select “Embed a map”.
- Click “Copy HTML”.
Here’s where it gets tricky: depending on your Shopify theme, you might have different options here.
For the purpose of this tutorial, we’ll go with the default “Debut” theme.
- Select the page where you want to add your reviews.
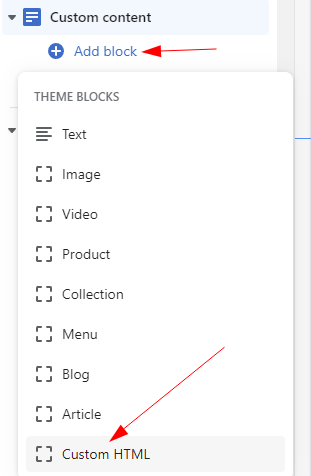
- In the left menu, click “Add section”, then choose “Custom content”.

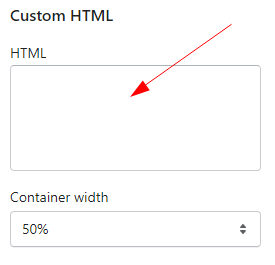
- Next, click “Add block” and “Custom HTML”.
- Then, just paste your clipboard into this menu on the right side.
You’re done! Google reviews are live on your store.
There’s just a few issues with this method:
- You are stuck with the “maps” view. Sadly, this is the only option Google provides.
- You can’t organize your reviews.
- No customization. If this doesn’t fit quite right on your site, you’ll have to go out of your way with CSS to make it look nice.
If this doesn’t work for you, check out options 2 and 3.
Option 2: Shopify apps
Shopify offers hundreds of apps to help you sell your products.
Google reviews apps are no exception:
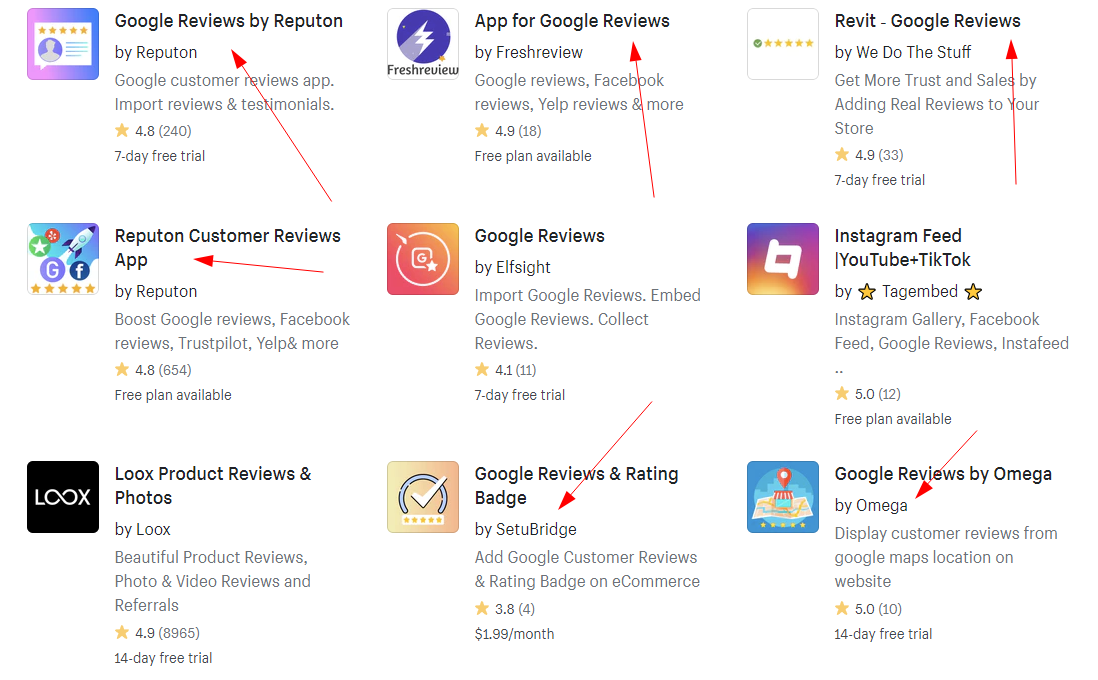
With these apps, you don’t have to do anything yourself: they pull the data from your existing Google My Business account and handle all the rest.
There are a lot of choices, so it’s difficult to say which app will work best for you. Trial and error until you find one that fits!
The one issue with Shopify apps is that if you have too many of them, they will break your website or noticeably slow it down.
Plus, customization is generally not their strong suit. And since they’re free, they are a little limited in functionality.
If that’s a problem, consider using option 3: Testimonial.to.
Option 3: Testimonial.to
After creating a Testimonial.to account, head over to your dashboard, and:
- Go to your desired space.
- Select “Embed code for the wall”.
- You’ll be met with a simple Javascript snippet. Click “Copy”.
With this snippet in your clipboard, go back to your Shopify editor and follow the steps from option 1:
- Select the page where you want to add your reviews. In the left menu, click “Add section”, then choose “Custom content”.
- Next, click “Add block” and “Custom HTML”.
- Then, just paste your clipboard in the right-side menu.
Your reviews now look something like this:

The best part about Testimonial.to is that it’s not “just” Google reviews:
1) You get all your testimonials in one place (Facebook, ProductHunt…)
2) You can pick and choose your favorite reviews and organize them how you like
3) It’s 100% customizable
4) It’s easier to collect reviews with built-in feedback pages
5) Analytics to see how your reviews perform
Sounds too good to pass on? We think so, too. Sign up for a free Testimonial.to trial!
Wrapping up…
And there you have it: 6 methods to embed Google reviews and testimonials to your website.
Anything unclear? Don’t hesitate to contact us and we’ll help you set it up!
Don’t want to bother with complicated tutorials? Make testimonials a one-time, headache-free setup with Testimonial.to: sign up for a free trial.
Written by


